> ## Documentation Index
> Fetch the complete documentation index at: https://docs.porter.run/llms.txt
> Use this file to discover all available pages before exploring further.
# Tailscale VPN
> Set up Tailscale VPN integration on your Porter cluster for secure private access to kubectl, helm, app run, and datastore connect commands
Tailscale is a VPN that creates a secure network between your servers, computers, and cloud instances. Porter integrates with Tailscale to provide secure access to your cluster resources over a private network (Tailnet).
To learn more about how Tailscale works under the hood, check out this [overview on their official blog](https://tailscale.com/blog/how-tailscale-works/).
## Scope
The Tailscale integration applies to the following Porter flows:
* `porter kubectl` and `porter helm` — CLI commands that tunnel through the Tailnet to reach the Kubernetes API server and in-cluster Helm releases.
* `porter app run` and `porter datastore connect` — when the Tailscale machine is marked as an exit node (see [Step 3](#step-3-approve-routes-in-tailscale) below).
* Direct access to Porter-managed applications and datastores over the approved subnet routes.
Tailscale does **not** change how the EKS API server endpoint itself is exposed. API server endpoint access is controlled by Porter's [Private Cluster setting](/cloud-accounts/advanced-cluster-settings#private-cluster), which locks the public endpoint to an IP allowlist independently of Tailscale.
## Setting up Tailscale
### Step 1: Create an OAuth Client in Tailscale
In the Tailscale admin dashboard, navigate to the **Access controls** tab and add the following to your policy file:
```json theme={null}
"tagOwners": {
"tag:k8s-operator": [],
"tag:k8s": ["tag:k8s-operator"],
},
```
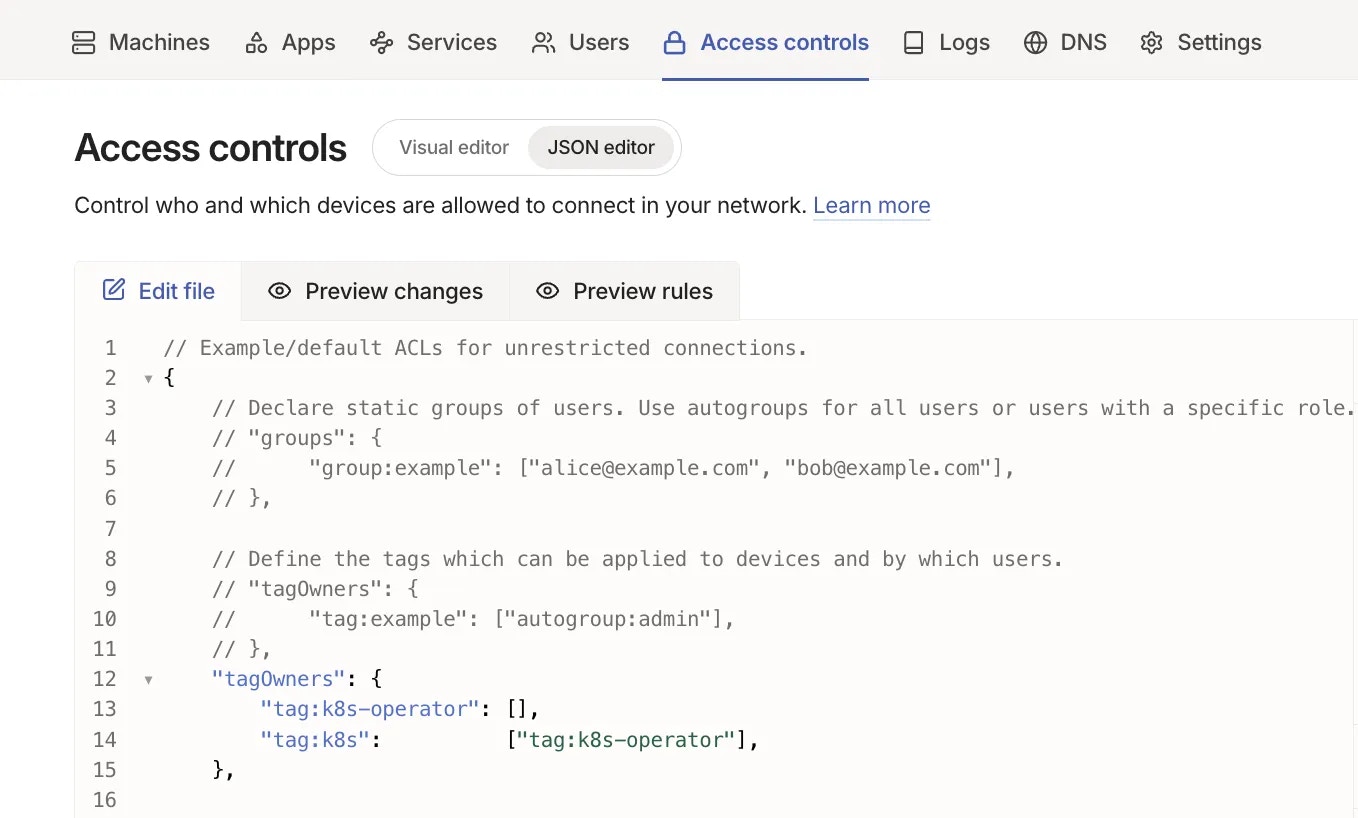 Click **Save** to save the changes.
1. Navigate to `Settings -> Trust credentials -> Add credential -> OAuth`
2. Select the **Core** and **Auth keys** scopes with write permissions
3. Click **Add tags** and select the `k8s-operator` tag
Click **Save** to save the changes.
1. Navigate to `Settings -> Trust credentials -> Add credential -> OAuth`
2. Select the **Core** and **Auth keys** scopes with write permissions
3. Click **Add tags** and select the `k8s-operator` tag
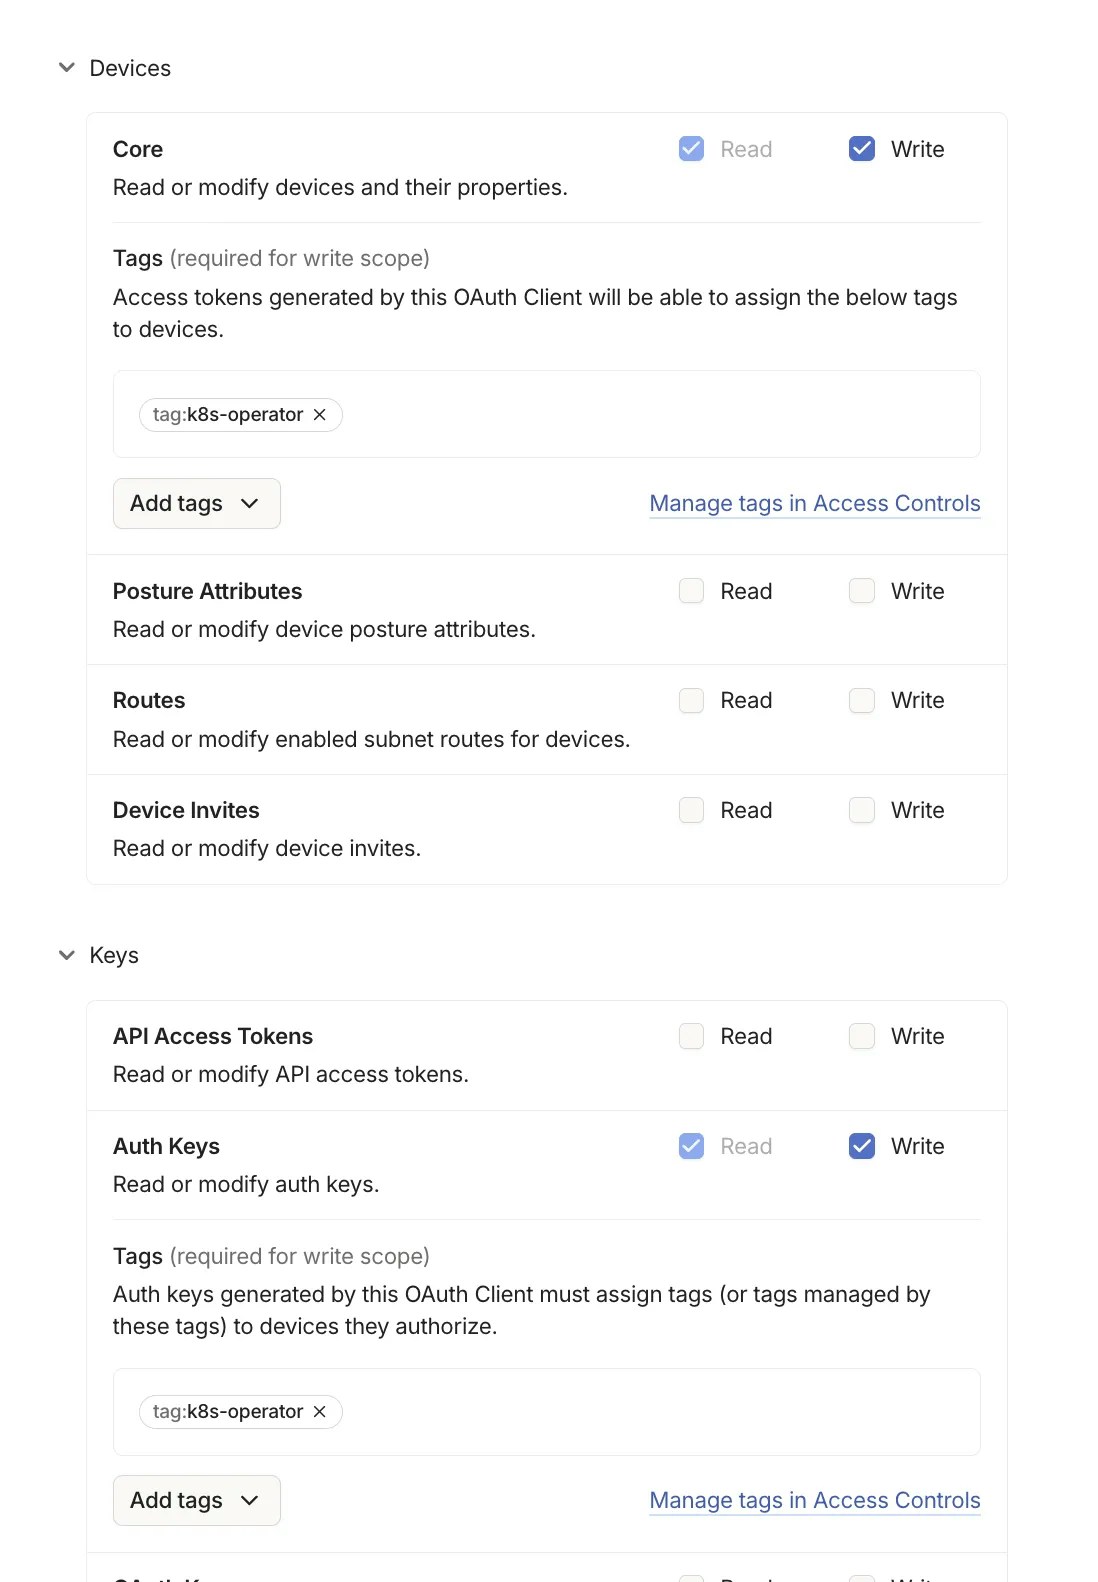 4. Click **Generate client**
Save the credentials securely—you will need them in the next steps and cannot retrieve them later.
### Step 2: Enable VPN on Your Cluster
In the Porter dashboard, go to **Infrastructure** → **VPN** tab.
Input your Tailscale OAuth Client ID and OAuth Secret.
Click **Save OAuth Credentials**.
Check **Enable VPN for this cluster** and update your cluster.
The cluster will update, and once finished, you should see the cluster and Tailscale operator in your Tailnet.
### Step 3: Approve Routes in Tailscale
By default, Porter ensures that all Porter-managed applications and datastores are accessible over the Tailnet. Each route must be approved by an admin in the Tailscale Admin Panel.
Visit your [Tailscale Admin Panel](https://login.tailscale.com/admin/machines) and click **Machines**.
Locate the machine named `cluster-ABC`, where `ABC` is the name of your Porter cluster.
1. Click the three dots on the right side of the cluster machine
2. Click **Edit Route settings...**
3. Click **Approve All** to approve all routes
If you intend to use `porter app run` or `porter datastore connect` commands, also check **Use as Exit Node**.
Your Tailscale subnet router is now online. All Porter applications and datastores should be accessible over the Tailnet.
***
## Subnet Routes
By default, the subnet routes for your cluster and all connected datastores are routed through Tailscale.
To add additional subnet routes:
1. Navigate to **Infrastructure** → **VPN**
2. Click **+ Add subnet route**
3. Enter the subnet CIDR you want to route through Tailscale
4. Update your cluster
***
## Troubleshooting
### VPN not connecting
If your VPN connection isn't working:
1. Verify the OAuth credentials are correct in Porter
2. Check that the `k8s-operator` tag is properly configured in your Tailscale ACL
3. Ensure routes are approved in the Tailscale Admin Panel
### Cannot access cluster resources
If you can't reach cluster resources over Tailscale:
1. Verify Tailscale is running on your local machine
2. Check that routes are approved in the Tailscale Admin Panel
3. Ensure your Tailscale client is connected to the same Tailnet
4. Try disconnecting and reconnecting your Tailscale client
4. Click **Generate client**
Save the credentials securely—you will need them in the next steps and cannot retrieve them later.
### Step 2: Enable VPN on Your Cluster
In the Porter dashboard, go to **Infrastructure** → **VPN** tab.
Input your Tailscale OAuth Client ID and OAuth Secret.
Click **Save OAuth Credentials**.
Check **Enable VPN for this cluster** and update your cluster.
The cluster will update, and once finished, you should see the cluster and Tailscale operator in your Tailnet.
### Step 3: Approve Routes in Tailscale
By default, Porter ensures that all Porter-managed applications and datastores are accessible over the Tailnet. Each route must be approved by an admin in the Tailscale Admin Panel.
Visit your [Tailscale Admin Panel](https://login.tailscale.com/admin/machines) and click **Machines**.
Locate the machine named `cluster-ABC`, where `ABC` is the name of your Porter cluster.
1. Click the three dots on the right side of the cluster machine
2. Click **Edit Route settings...**
3. Click **Approve All** to approve all routes
If you intend to use `porter app run` or `porter datastore connect` commands, also check **Use as Exit Node**.
Your Tailscale subnet router is now online. All Porter applications and datastores should be accessible over the Tailnet.
***
## Subnet Routes
By default, the subnet routes for your cluster and all connected datastores are routed through Tailscale.
To add additional subnet routes:
1. Navigate to **Infrastructure** → **VPN**
2. Click **+ Add subnet route**
3. Enter the subnet CIDR you want to route through Tailscale
4. Update your cluster
***
## Troubleshooting
### VPN not connecting
If your VPN connection isn't working:
1. Verify the OAuth credentials are correct in Porter
2. Check that the `k8s-operator` tag is properly configured in your Tailscale ACL
3. Ensure routes are approved in the Tailscale Admin Panel
### Cannot access cluster resources
If you can't reach cluster resources over Tailscale:
1. Verify Tailscale is running on your local machine
2. Check that routes are approved in the Tailscale Admin Panel
3. Ensure your Tailscale client is connected to the same Tailnet
4. Try disconnecting and reconnecting your Tailscale client