> ## Documentation Index
> Fetch the complete documentation index at: https://docs.porter.run/llms.txt
> Use this file to discover all available pages before exploring further.
# Configuring AWS ALB on Porter
> Switch from NLB to AWS Application Load Balancer on Porter for IP allowlisting, WAFv2 integration, ACM certificates, and DNS validation
The default Porter-managed Kubernetes cluster on AWS uses a Network Load Balancer (NLB) which forwards traffic to an on-cluster Nginx Ingress Controller.
Whilst this provides the best performance, some users have extra requirements which require an ALB such as:
* allowlisting specific IP ranges for applications deployed on Porter
* integrating with other AWS tools such as AWS WAFv2
* using AWS ACM certificates
As an enterprise feature, Porter supports switching out the default NLB for an Application Load Balancer (ALB).
## Requirements
* A Porter-managed Kubernetes cluster
* Access to your DNS provider. For this example, we will use CloudFlare, but Route53 is also supported.
* A domain name which can be wildcarded. For this example, we will use `stefan-2.porter.run`
* Using a wildcard domain is **strongly** recommended as you can then create multiple applications which are exposed to internet through Porter, without any further changes in future
If the following options are not available to you, please reach out to Porter using the chatbot on the dashboard for more information
## DNS Validation
Skip this step if you are using Route53, as Porter can perform the validation on your behalf.
When your ALB is up and running, you will have to ensure that your new AWS Certificate Manager (ACM) Certificate is validated. AWS does this by creating a CNAME record which must resolve to an automatically generated value.
### AWS Certificate Manager - CNAME
1. In your AWS console, navigate to the region that your cluster was deployed in. You can find this from your Porter dashboard in the `Infrastructure` section, in the Configuration tab.
2. After selecting the correct region, search for `AWS Certificate Manager` in the AWS Console search bar.
3. Select `List Certificates` from the bar on the left.
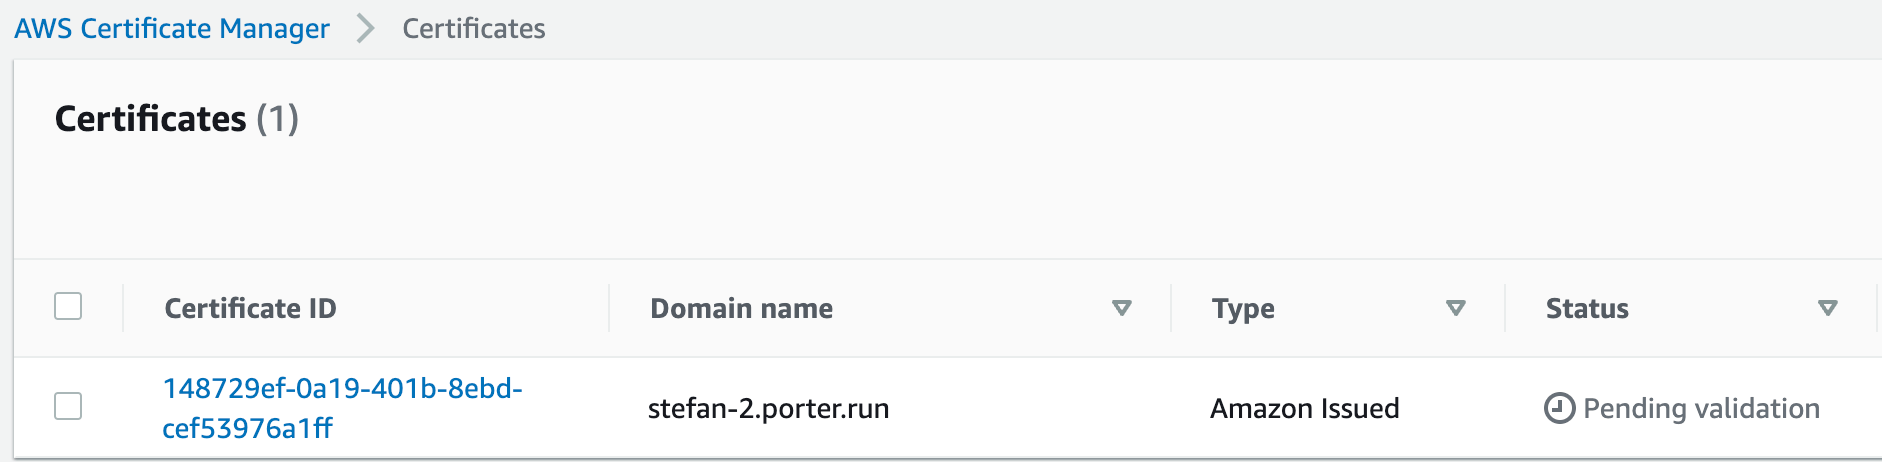
4. Find the domain name which matches the domain that you provided to Porter, then click on the Certificate ID.
5. The status for this certificate should be `Pending validation`.
 6. Scroll down to `Domains`.
7. Take note of the `CNAME name` and `CNAME value`.
6. Scroll down to `Domains`.
7. Take note of the `CNAME name` and `CNAME value`.
 * You may see multiple domains here, all with the same CNAME name and CNAME value. No need to worry about these.
8. Go to your DNS provider. This will be CloudFlare in our case.
### CloudFlare
1. Select `DNS` then `Records`.
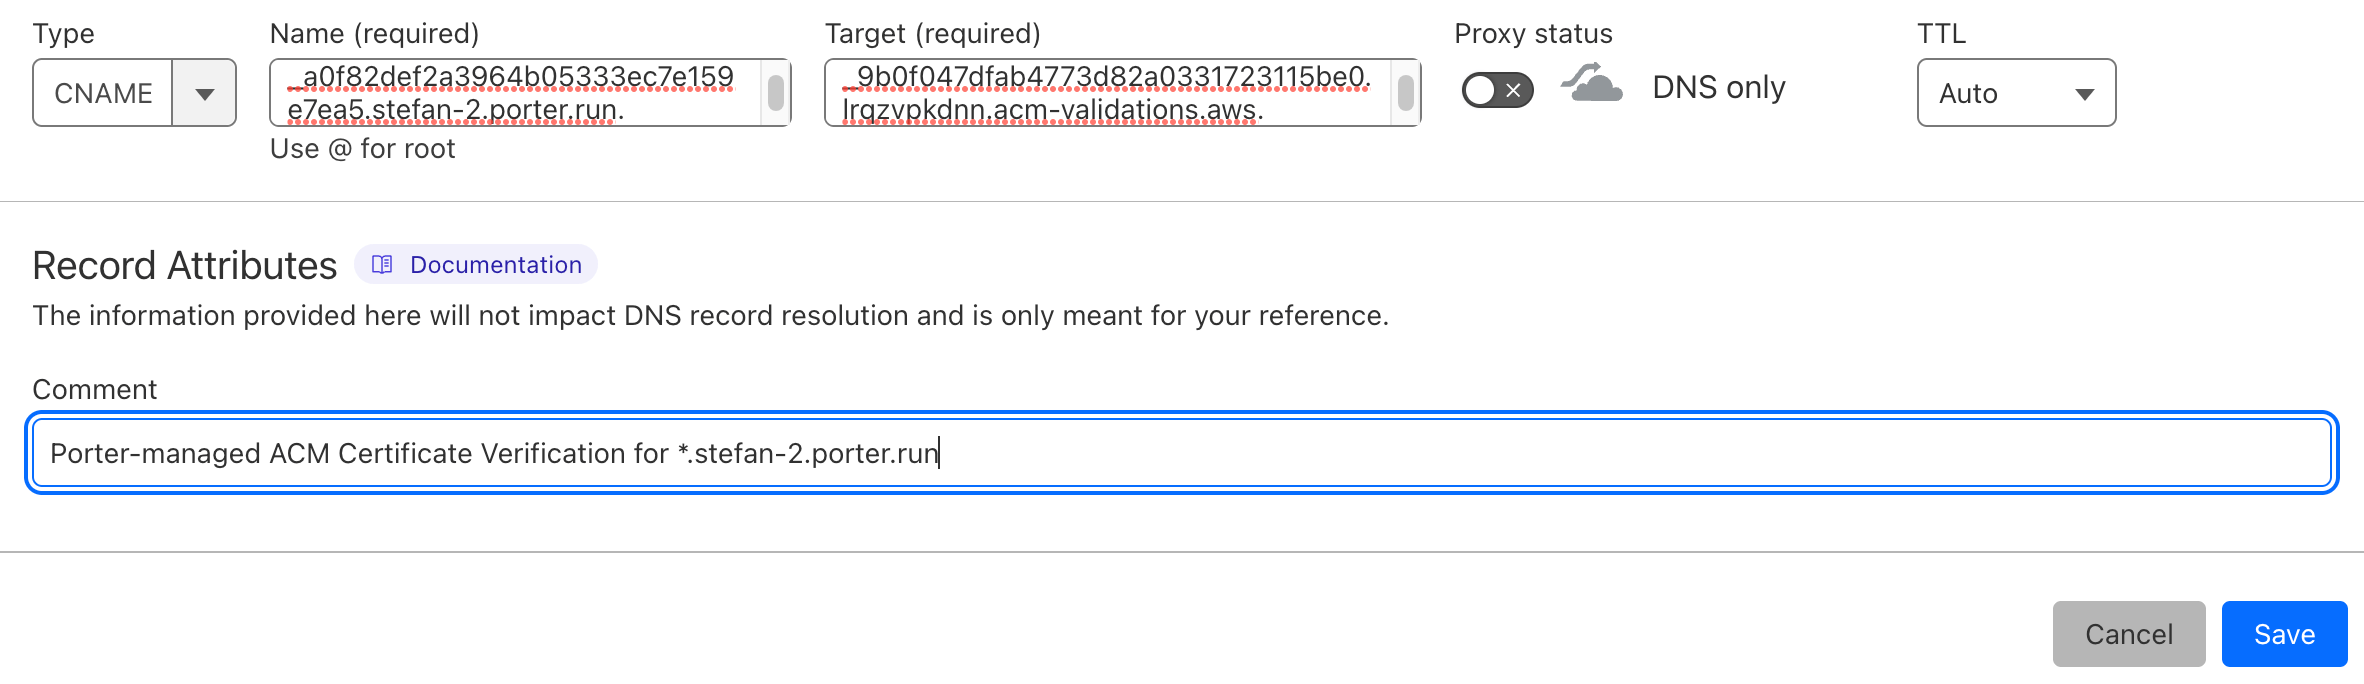
2. Create a new record - Select `CNAME` for type.
* Enter the value that you pulled from AWS for `CNAME name` in the `Name` field in CloudFlare.
* Enter the value that you pulled from AWS for `CNAME value` in the `Target` field in CloudFlare.
* Ensure `Proxy status` is disabled, and is in `DNS only` mode.
* Set `TTL` to `Auto`.
* Enter `Porter-managed ACM Certificate Verification for YOUR_DOMAIN` in the `Comment` field. This is not required, but is strongly recommended.
* You may see multiple domains here, all with the same CNAME name and CNAME value. No need to worry about these.
8. Go to your DNS provider. This will be CloudFlare in our case.
### CloudFlare
1. Select `DNS` then `Records`.
2. Create a new record - Select `CNAME` for type.
* Enter the value that you pulled from AWS for `CNAME name` in the `Name` field in CloudFlare.
* Enter the value that you pulled from AWS for `CNAME value` in the `Target` field in CloudFlare.
* Ensure `Proxy status` is disabled, and is in `DNS only` mode.
* Set `TTL` to `Auto`.
* Enter `Porter-managed ACM Certificate Verification for YOUR_DOMAIN` in the `Comment` field. This is not required, but is strongly recommended.
 3. Return to the AWS console.
### AWS Certificate Manager - Status
1. Go to the ACM Certificate and refresh the page.
2. If the status is still `Pending Validation`, wait 5 minutes then refresh again. You should now see that the status is `Issued`.
3. Return to the AWS console.
### AWS Certificate Manager - Status
1. Go to the ACM Certificate and refresh the page.
2. If the status is still `Pending Validation`, wait 5 minutes then refresh again. You should now see that the status is `Issued`.
 3. Your certificate is now issued, and can be used by your ALB.
## Creating a CNAME for your wildcard domain
As a reminder, we are using `stefan-2.porter.run` as the address that we provided to Porter. All of our protected applications will be available at `*.stefan-2.porter.run` for example `myapp.stefan-2.porter.run` or `whoami.stefan-2.porter.run`.
1. Go to your DNS provider. We will be using CloudFlare, but the settings should be similar in any DNS Provider.
1 Select `DNS` then `Records`.
2. Create a new record.
* Select `CNAME` for type.
* Enter the wildcarded domain in the `Name` field i.e. `*.stefan-2.porter.run`.
* Enter the ALB domain name in `Target` field. This will be provided to you by the Porter engineer.
* Ensure `Proxy status` is disabled, and is in `DNS only` mode.
* Set `TTL` to `Auto`.
3. Your certificate is now issued, and can be used by your ALB.
## Creating a CNAME for your wildcard domain
As a reminder, we are using `stefan-2.porter.run` as the address that we provided to Porter. All of our protected applications will be available at `*.stefan-2.porter.run` for example `myapp.stefan-2.porter.run` or `whoami.stefan-2.porter.run`.
1. Go to your DNS provider. We will be using CloudFlare, but the settings should be similar in any DNS Provider.
1 Select `DNS` then `Records`.
2. Create a new record.
* Select `CNAME` for type.
* Enter the wildcarded domain in the `Name` field i.e. `*.stefan-2.porter.run`.
* Enter the ALB domain name in `Target` field. This will be provided to you by the Porter engineer.
* Ensure `Proxy status` is disabled, and is in `DNS only` mode.
* Set `TTL` to `Auto`.
 3. You can now use this as a custom domain in Porter for your applications. See [Deploying on the Custom Domain](/applications/configure/custom-domains#custom-domains) to setup your new domain to be compatible with Porter.