> ## Documentation Index
> Fetch the complete documentation index at: https://docs.porter.run/llms.txt
> Use this file to discover all available pages before exploring further.
# Temporal autoscaling
> Automatically scale Temporal worker services based on task queue backlog depth using a Temporal Cloud API key and Porter integration
# Temporal Autoscaling
If you're using [Temporal](https://temporal.io) for workflow orchestration, Porter can automatically scale your worker services based on task queue depth. This ensures your workers scale up when there's a backlog of tasks and scale down when queues are empty.
## Prerequisites
Before configuring Temporal autoscaling, you'll need:
* A Temporal Cloud account
* The task queue name your workers poll from
## Step 1: Create a Service Account and API Key
Porter needs an API key to monitor your task queue depth. We recommend creating a dedicated service account with minimal permissions rather than using a personal API key.
### Required Permission
Porter only needs **Read** permission on your namespace. This allows Porter to call `DescribeTaskQueue` to retrieve the queue backlog count for scaling decisions. Read permission does not allow starting, terminating, or modifying workflows.
### Create a Service Account
1. Log in to [Temporal Cloud](https://cloud.temporal.io)
2. Navigate to **Settings** → **Identities**
3. Click **Create Service Account**
4. Configure the service account:
* **Name**: A descriptive name (e.g., `porter-autoscaling`)
* **Description**: Optional description (e.g., "Used by Porter for autoscaling workers")
* **Account Level Role**: Select **Read** (minimum required)
* **Namespace Permissions**: Add your namespace with **Read** permission
5. Click **Create Service Account**
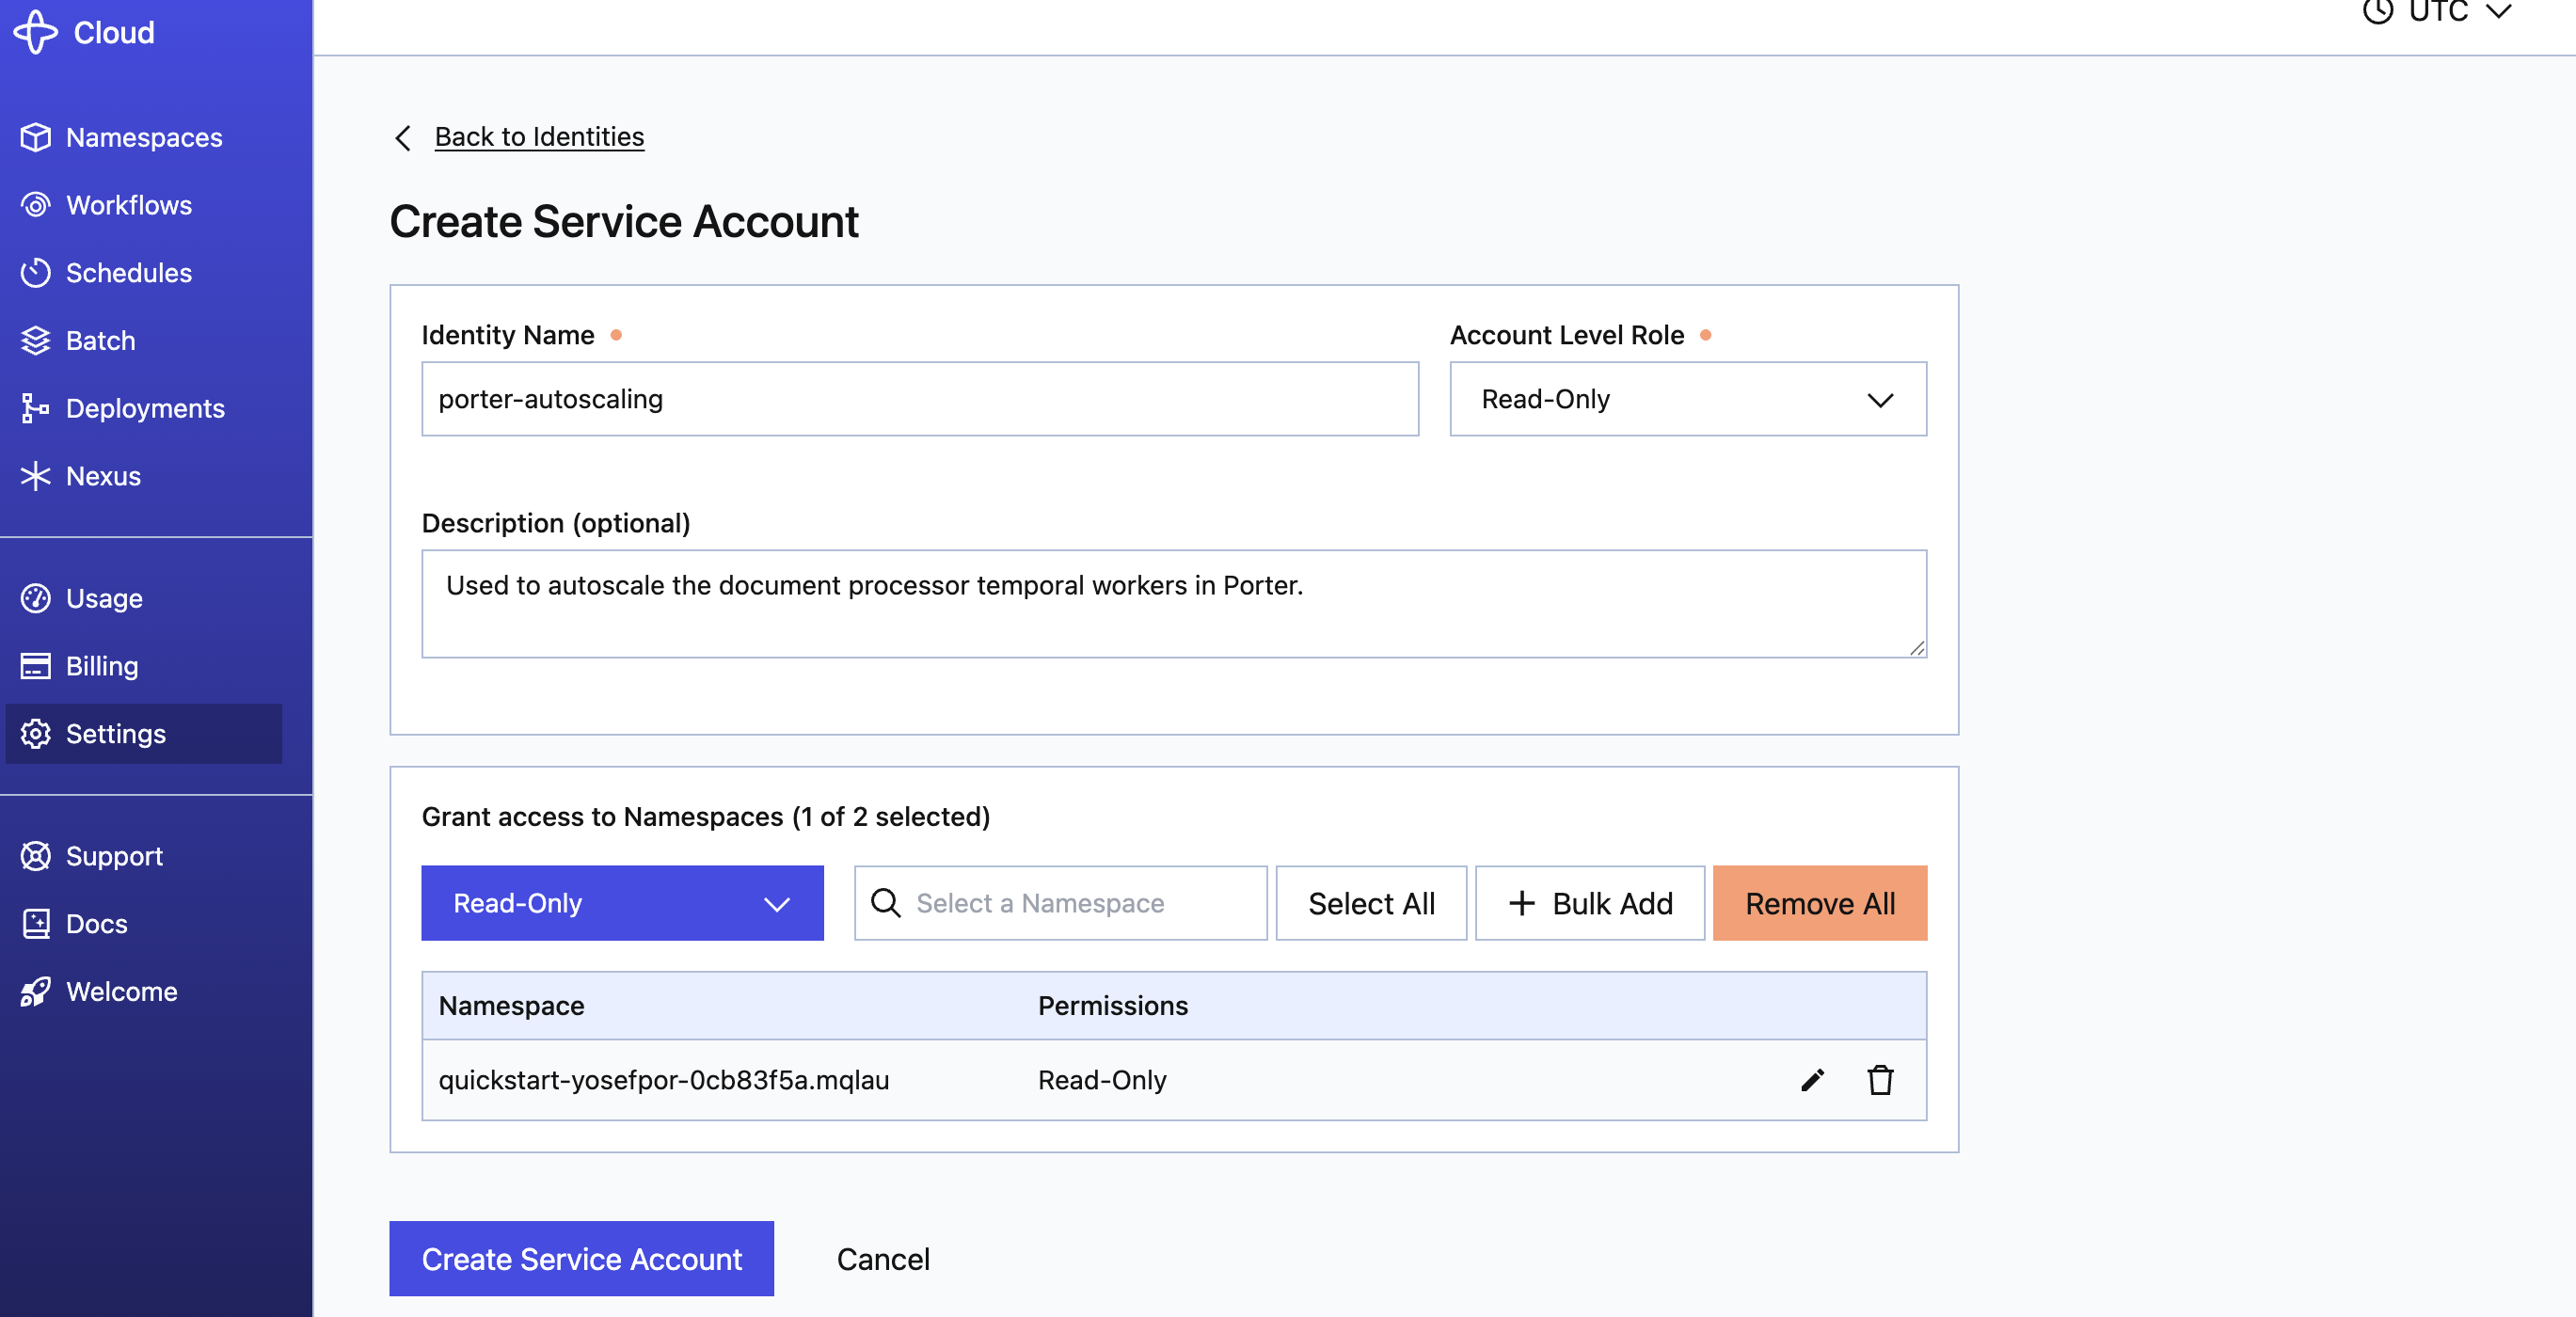 *Creating a service account in Temporal Cloud*
### Create an API Key for the Service Account
1. After creating the service account, navigate to **Settings** → **API Keys**
2. Click **Create API Key**
3. Configure the API key:
* **Identity Type**: Select **Service Account**
* **Service Account**: Select the service account you created (e.g., `porter-autoscaling`)
* **Name**: A name for this key (e.g., `porter-production`)
* **Description**: Optional description
* **Expiration**: Set an appropriate expiration date
4. Click **Generate API Key**
5. **Copy the API key immediately** — it will only be displayed once
*Creating a service account in Temporal Cloud*
### Create an API Key for the Service Account
1. After creating the service account, navigate to **Settings** → **API Keys**
2. Click **Create API Key**
3. Configure the API key:
* **Identity Type**: Select **Service Account**
* **Service Account**: Select the service account you created (e.g., `porter-autoscaling`)
* **Name**: A name for this key (e.g., `porter-production`)
* **Description**: Optional description
* **Expiration**: Set an appropriate expiration date
4. Click **Generate API Key**
5. **Copy the API key immediately** — it will only be displayed once
 *Creating an API key for the service account*
**Important:** Store your API key securely. Porter encrypts the key before storing it. For more details, see the [Temporal Cloud Service Accounts](https://docs.temporal.io/cloud/service-accounts) and [API Keys](https://docs.temporal.io/cloud/api-keys) documentation.
**Note:** Porter requires API key authentication and does not support certificate-only (mTLS) authentication. If your Temporal namespace is configured to only allow certificate authentication, contact [Temporal Support](https://support.temporal.io) to enable API keys on your namespace.
## Step 2: Create a Temporal Integration in Porter
Before you can use Temporal autoscaling, you need to register your Temporal cluster as an integration in Porter.
1. Navigate to **Integrations** in the Porter dashboard
2. Select the **Temporal** tab
3. Click **Add Integration**
4. Fill in the integration details:
* **Name**: A friendly name for this integration (e.g., `production-temporal`)
* **Endpoint**: Your Temporal Cloud endpoint (e.g., `my-namespace.a1b2c.tmprl.cloud:7233`)
* **Namespace**: Your Temporal namespace (e.g., `my-namespace.a1b2c`)
* **API Key**: The API key you created in Step 1
5. Click **Add integration**
*Creating an API key for the service account*
**Important:** Store your API key securely. Porter encrypts the key before storing it. For more details, see the [Temporal Cloud Service Accounts](https://docs.temporal.io/cloud/service-accounts) and [API Keys](https://docs.temporal.io/cloud/api-keys) documentation.
**Note:** Porter requires API key authentication and does not support certificate-only (mTLS) authentication. If your Temporal namespace is configured to only allow certificate authentication, contact [Temporal Support](https://support.temporal.io) to enable API keys on your namespace.
## Step 2: Create a Temporal Integration in Porter
Before you can use Temporal autoscaling, you need to register your Temporal cluster as an integration in Porter.
1. Navigate to **Integrations** in the Porter dashboard
2. Select the **Temporal** tab
3. Click **Add Integration**
4. Fill in the integration details:
* **Name**: A friendly name for this integration (e.g., `production-temporal`)
* **Endpoint**: Your Temporal Cloud endpoint (e.g., `my-namespace.a1b2c.tmprl.cloud:7233`)
* **Namespace**: Your Temporal namespace (e.g., `my-namespace.a1b2c`)
* **API Key**: The API key you created in Step 1
5. Click **Add integration**
 *Adding a Temporal integration in Porter*
Once created, your Temporal integration will appear in the integrations list and can be used for autoscaling any worker service.
*Adding a Temporal integration in Porter*
Once created, your Temporal integration will appear in the integrations list and can be used for autoscaling any worker service.
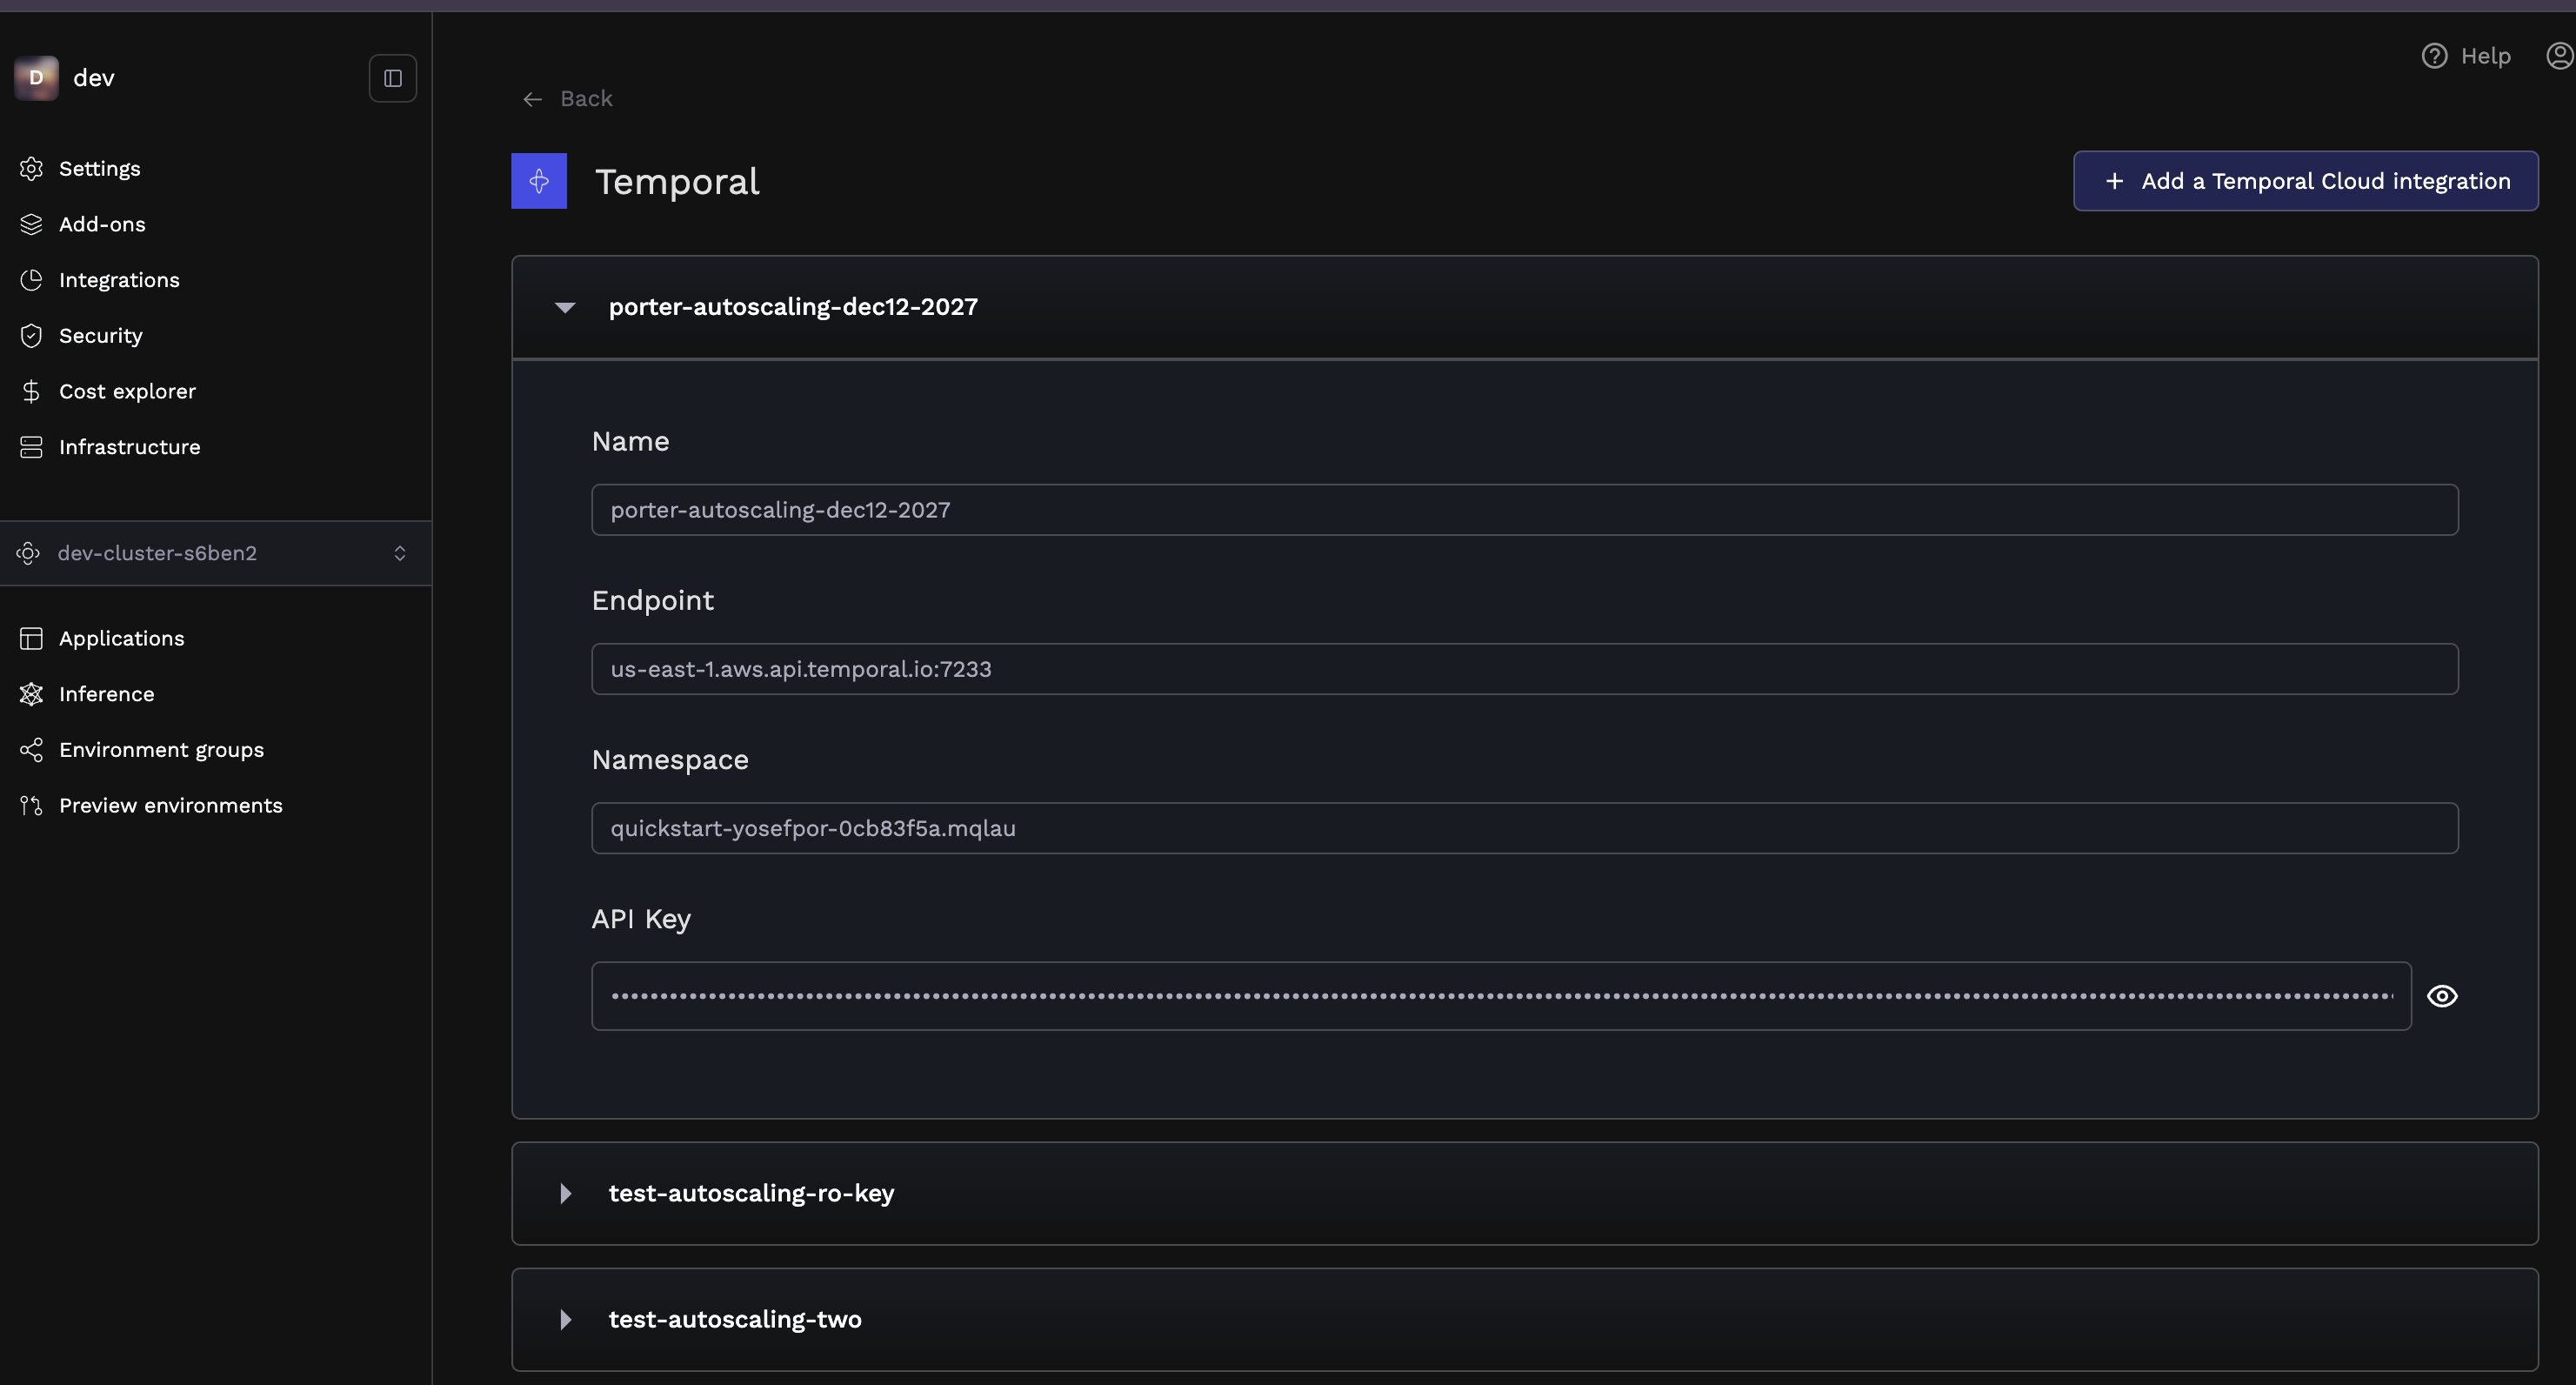 *Temporal integrations in the Integrations page*
## Step 3: Configure Temporal Autoscaling for Your Service
With your Temporal integration set up, you can now configure autoscaling for your worker services.
1. Navigate to your application dashboard
2. Select your worker service
3. Go to the **Resources** tab
4. Enable **Autoscaling** and select **Temporal** as the autoscaling type
5. Configure the autoscaling settings:
* **Min instances**: Minimum number of worker replicas (e.g., 1)
* **Max instances**: Maximum number of worker replicas (e.g., 20)
* **Temporal Integration**: Select the integration you created in Step 2
* **Task queue name**: The name of the task queue your workers poll (e.g., `my-workflow-queue`)
* **Target queue size**: The target number of tasks per worker instance
*Temporal integrations in the Integrations page*
## Step 3: Configure Temporal Autoscaling for Your Service
With your Temporal integration set up, you can now configure autoscaling for your worker services.
1. Navigate to your application dashboard
2. Select your worker service
3. Go to the **Resources** tab
4. Enable **Autoscaling** and select **Temporal** as the autoscaling type
5. Configure the autoscaling settings:
* **Min instances**: Minimum number of worker replicas (e.g., 1)
* **Max instances**: Maximum number of worker replicas (e.g., 20)
* **Temporal Integration**: Select the integration you created in Step 2
* **Task queue name**: The name of the task queue your workers poll (e.g., `my-workflow-queue`)
* **Target queue size**: The target number of tasks per worker instance
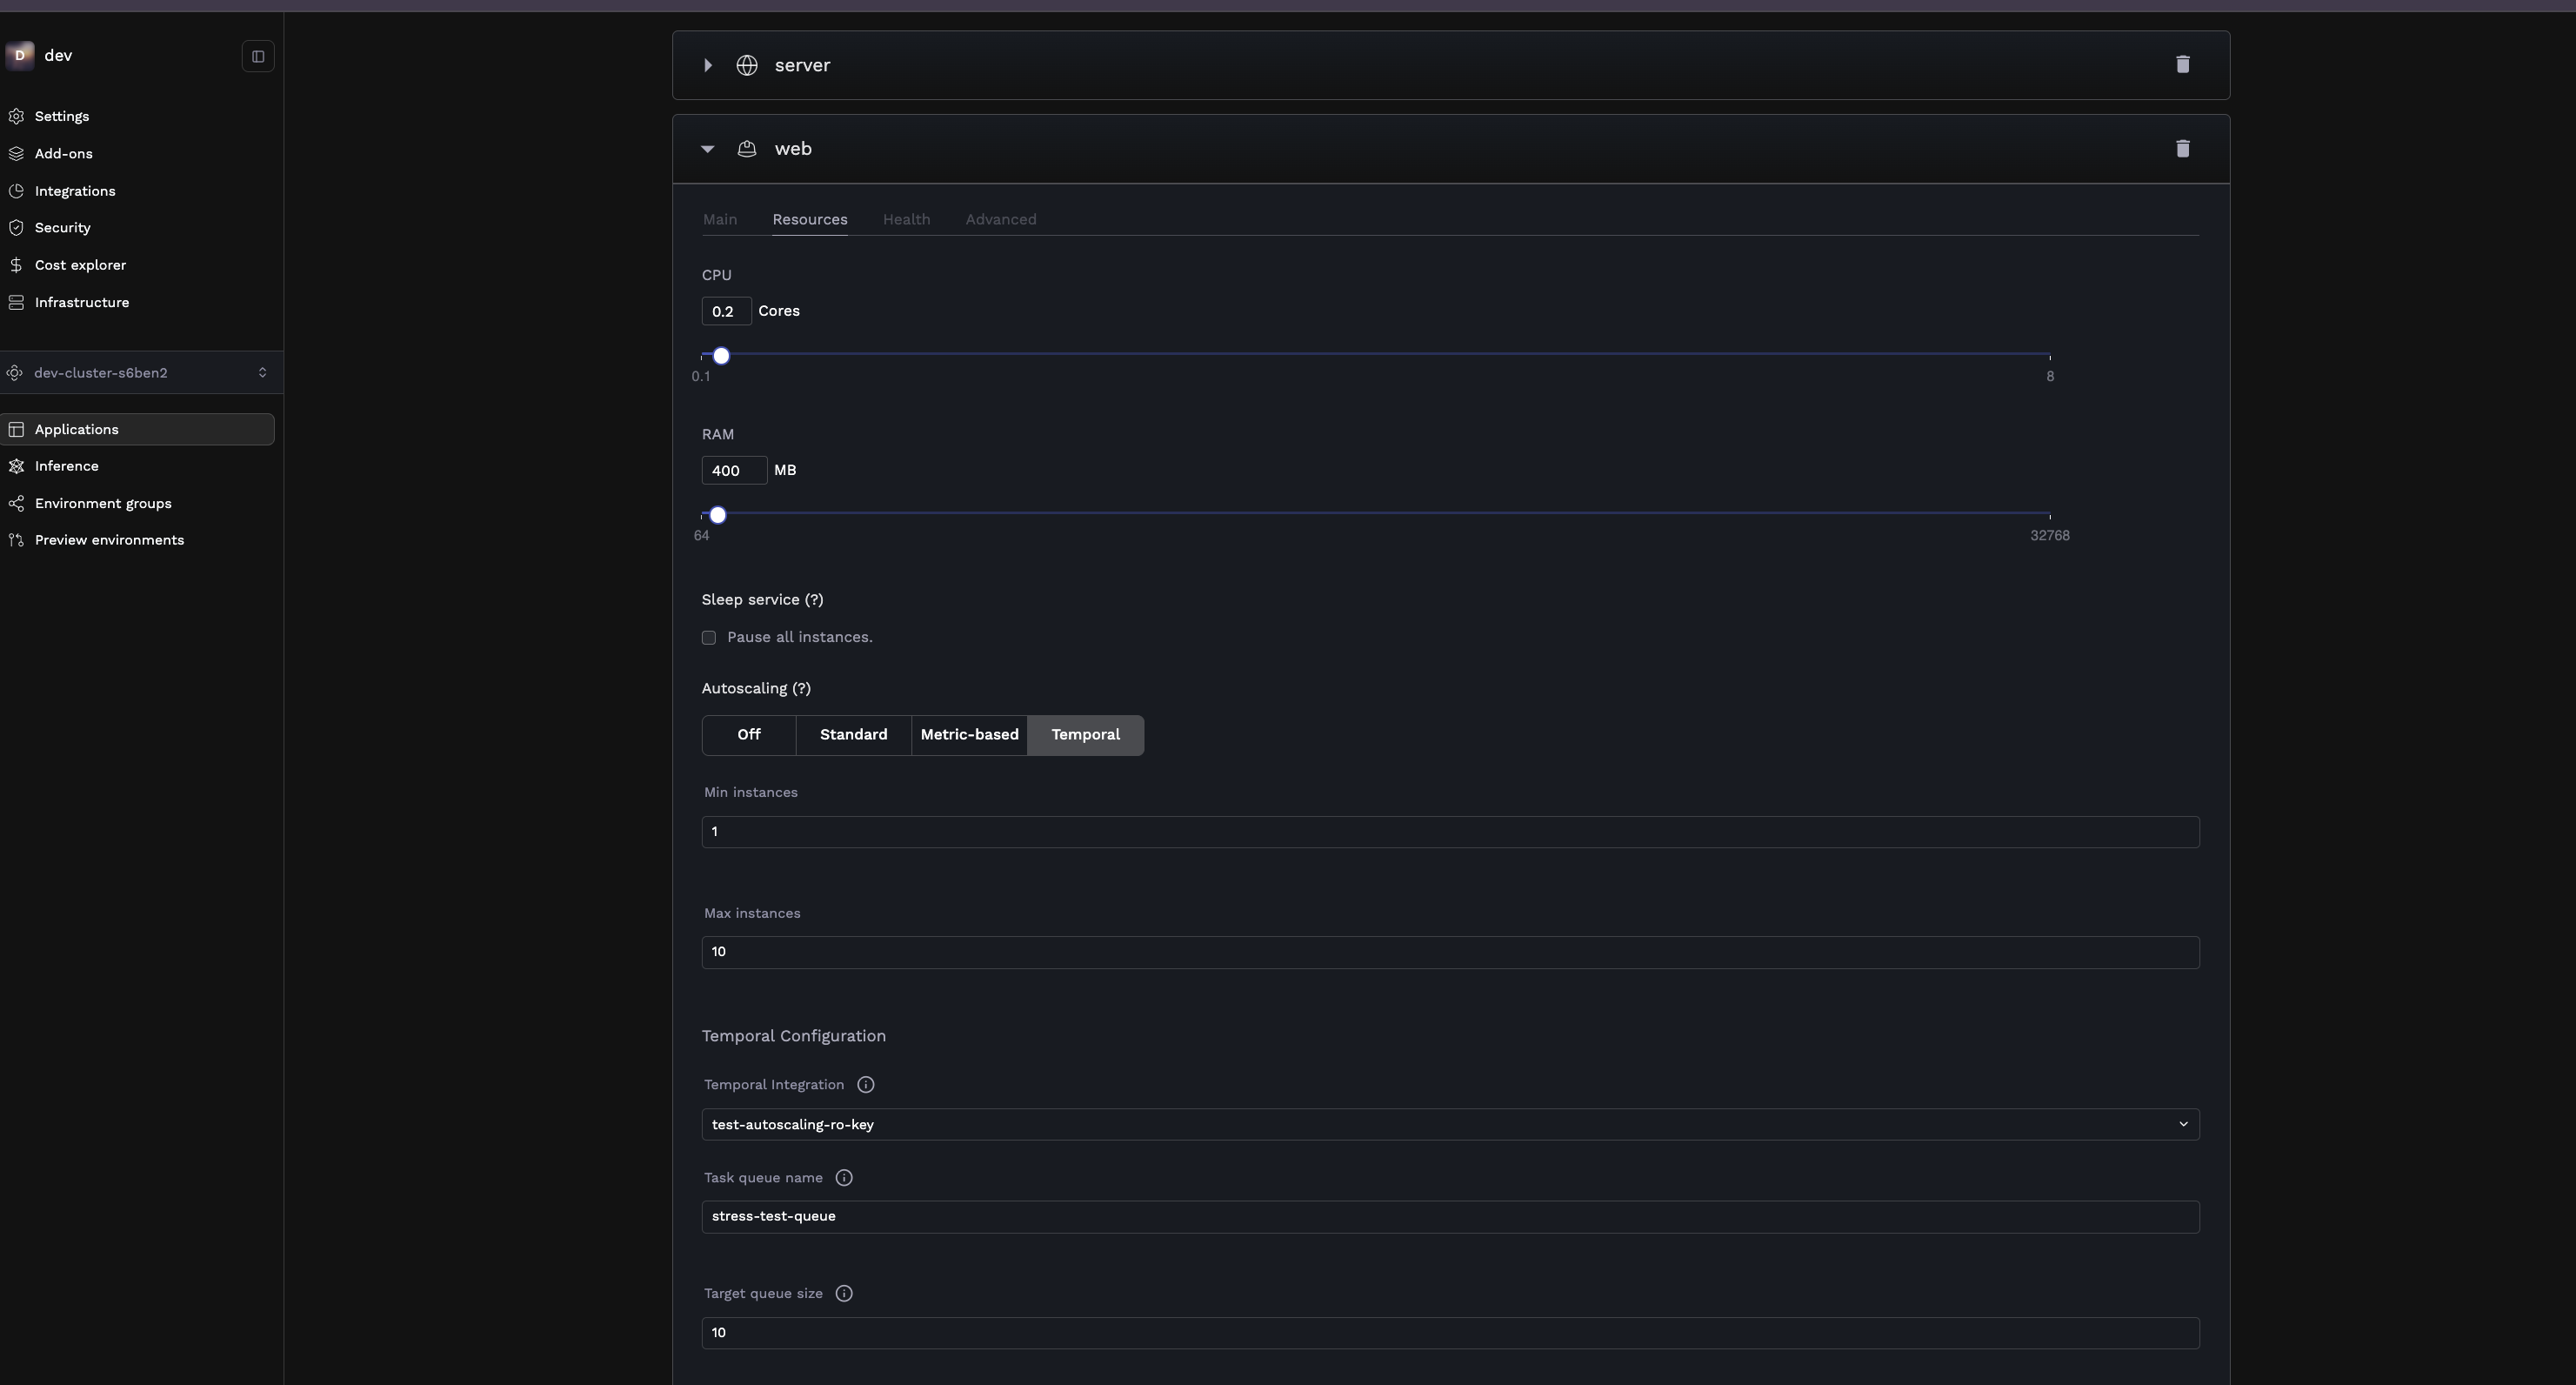 *Configuring Temporal autoscaling for a worker service*
## How Target Queue Size Works
The **target queue size** determines how Porter scales your workers. Porter calculates the desired number of replicas as:
```
desired_replicas = ceil(current_queue_depth / target_queue_size)
```
For example:
* If your queue has 100 pending tasks and target queue size is 10, Porter scales to 10 workers
* If your queue has 5 pending tasks and target queue size is 10, Porter scales to 1 worker
* If your queue is empty, Porter scales to your minimum instances
**Choosing a target queue size:**
* **Lower values** (e.g., 5-10): More aggressive scaling, lower latency for processing tasks
* **Higher values** (e.g., 50-100): More conservative scaling, better resource efficiency
## Example: Document Processing Pipeline
Consider a document processing system built with Temporal:
### Document Upload API
A web service that receives document uploads and starts Temporal workflows for processing.
```python theme={null}
from temporalio.client import Client
@app.post("/upload")
async def upload_document(file: UploadFile):
# Start a Temporal workflow for each uploaded document
await temporal_client.start_workflow(
ProcessDocumentWorkflow.run,
args=[file.filename],
id=f"doc-{uuid4()}",
task_queue="document-processing"
)
return {"status": "processing"}
```
### Document Processing Worker
A worker service that runs the document processing workflows.
```python theme={null}
from temporalio.worker import Worker
async def main():
client = await Client.connect("your-namespace.tmprl.cloud:7233")
worker = Worker(
client,
task_queue="document-processing",
workflows=[ProcessDocumentWorkflow],
activities=[extract_text, analyze_content, store_results],
)
await worker.run()
```
### Autoscaling Configuration
* Min instances: `1`
* Max instances: `20`
* Task queue: `document-processing`
* Target queue size: `10`
With this configuration, Porter will:
* Keep at least 1 worker running during quiet periods
* Scale up to 20 workers during document upload spikes
* Scale based on the actual queue depth, ensuring documents are processed promptly
*Configuring Temporal autoscaling for a worker service*
## How Target Queue Size Works
The **target queue size** determines how Porter scales your workers. Porter calculates the desired number of replicas as:
```
desired_replicas = ceil(current_queue_depth / target_queue_size)
```
For example:
* If your queue has 100 pending tasks and target queue size is 10, Porter scales to 10 workers
* If your queue has 5 pending tasks and target queue size is 10, Porter scales to 1 worker
* If your queue is empty, Porter scales to your minimum instances
**Choosing a target queue size:**
* **Lower values** (e.g., 5-10): More aggressive scaling, lower latency for processing tasks
* **Higher values** (e.g., 50-100): More conservative scaling, better resource efficiency
## Example: Document Processing Pipeline
Consider a document processing system built with Temporal:
### Document Upload API
A web service that receives document uploads and starts Temporal workflows for processing.
```python theme={null}
from temporalio.client import Client
@app.post("/upload")
async def upload_document(file: UploadFile):
# Start a Temporal workflow for each uploaded document
await temporal_client.start_workflow(
ProcessDocumentWorkflow.run,
args=[file.filename],
id=f"doc-{uuid4()}",
task_queue="document-processing"
)
return {"status": "processing"}
```
### Document Processing Worker
A worker service that runs the document processing workflows.
```python theme={null}
from temporalio.worker import Worker
async def main():
client = await Client.connect("your-namespace.tmprl.cloud:7233")
worker = Worker(
client,
task_queue="document-processing",
workflows=[ProcessDocumentWorkflow],
activities=[extract_text, analyze_content, store_results],
)
await worker.run()
```
### Autoscaling Configuration
* Min instances: `1`
* Max instances: `20`
* Task queue: `document-processing`
* Target queue size: `10`
With this configuration, Porter will:
* Keep at least 1 worker running during quiet periods
* Scale up to 20 workers during document upload spikes
* Scale based on the actual queue depth, ensuring documents are processed promptly